Introduction
In this digital age, capturing pictures with our iPhones has become an integral part of our lives. However, sometimes we want to remove the background from a picture to focus on the main subject or to use it in creative projects. Luckily, there are various methods and apps available that can help us achieve this task. In this article, we will explore step-by-step methods on how to remove the background from a picture on iPhone, without the need for any specialized equipment or software.
Table of contents
- Introduction
- Why Would You Need to Remove Backgrounds?
- Built-in Editing Tool on iPhone
- Third-Party Apps for Background Removal
- Advanced Editing Techniques
- Tips for Better Background Removal
- Creative Uses of Background Removal
- Potential Challenges and How to Overcome Them
- Best Practices for Background Removal
- Conclusion
What is Background Removal?
Background removal is the process of eliminating the background from an image, leaving only the main subject or object in focus. It involves using various editing tools and techniques to separate the subject from its surroundings, creating a transparent or solid-colored background. This editing process is commonly used in photography, graphic design, and creative projects to isolate subjects and enhance the visual impact of an image.
Why Would You Need to Remove Backgrounds?
There are several compelling reasons why you might need to remove backgrounds from pictures on your iPhone:
Product Photography
When selling products online, having a clean, isolated image of the item can significantly improve its presentation and increase sales.
Social Media Posts
For eye-catching social media posts, removing distracting backgrounds can help draw attention to the main message or subject.
Graphic Design
In graphic design projects, transparent backgrounds enable seamless integration of images into various layouts.
E-commerce
Online stores often require product images with transparent backgrounds for a consistent and professional look.
Website Design
Transparent backgrounds are essential for creating engaging banners, logos, and headers on websites.
By understanding background removal and its diverse applications, you can unlock the potential of your iPhone photography and unleash your creativity with visually compelling images.
Built-in Editing Tool on iPhone
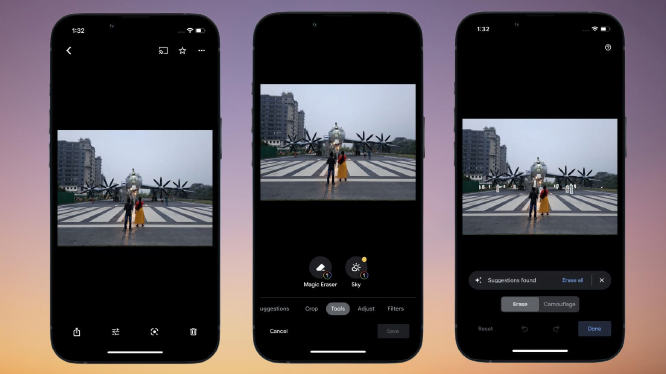
The iPhone comes equipped with a powerful built-in editing tool that allows users to make quick adjustments to their photos. To access this tool, open the Photos app and select the image you want to edit. Tap on the “Edit” option at the top right corner of the screen, and you’ll find various editing options, including the Magic Eraser tool.
Using the Magic Eraser Tool
The Magic Eraser tool is a handy feature that automatically detects and removes the background from an image. To use it, tap on the “Magic Eraser” icon, and the tool will start working its magic. It’s essential to ensure that your subject is well-defined and distinct from the background for optimal results.

Manual Selection for Precise Editing
In cases where the Magic Eraser tool doesn’t provide the desired accuracy, you can use the manual selection method. Simply tap on the “Markup” icon, followed by the “+” sign. Now, use your finger or Apple Pencil to trace around the subject and remove the background.
Third-Party Apps for Background Removal
For more advanced editing options and seamless background removal, third-party apps are available on the App Store. Here are some top picks:
App 1: Background Eraser
This app offers intuitive controls to remove the background with precision. Its AI-powered tool ensures that even complex backgrounds can be erased efficiently.

App 2: Remove.bg
Remove.bg specializes in automatic background removal, making it a favorite among users looking for quick results.

App 3: Superimpose
Superimpose is an excellent choice for users who want to blend multiple images seamlessly and create stunning compositions.

Advanced Editing Techniques
For users seeking professional-level editing, mastering advanced techniques is essential. Two key techniques are:
Layering and Masking
Layering and masking involve combining multiple images and using masks to remove unwanted elements, such as backgrounds, while retaining the main subject.
Creating Transparent Backgrounds
Creating transparent backgrounds can be achieved by saving images in formats like PNG, which support transparency.
Refining Edges for Professional Results
To achieve high-quality results, refining the edges of the subject is crucial. This ensures a clean and professional look for your edited images.
Tips for Better Background Removal
To enhance your background removal skills, consider the following tips:
Good Lighting Conditions
Ensure your subject is well-lit and that there’s ample contrast between the subject and the background.
Contrast and Color Adjustment
Adjust the contrast and colors to make it easier for the editing tool to detect the edges of your subject accurately.
Zoom and Rotate for Accuracy
Zooming in and rotating the image allows you to focus on intricate details and achieve better accuracy during manual selection.
Creative Uses of Background Removal
Once you’ve mastered the art of background removal, you can explore various creative applications:
Creating Memes and Social Media Posts
With background removal, you can effortlessly create humorous memes and eye-catching social media posts.
Designing Personalized Digital Art
Background removal enables you to personalize your digital art by incorporating subjects into different environments and settings.
Making Customized Stickers and Emojis
Use background removal to create custom stickers and emojis featuring your favorite characters and objects.
Potential Challenges and How to Overcome Them
While background removal can be fun and rewarding, you may encounter some challenges:
Dealing with Complex Backgrounds
Complex backgrounds may require more time and effort to edit accurately. Be patient and use advanced tools if needed.
Handling Fine Details and Fuzzy Edges
Intricate details and fuzzy edges may pose challenges. Use manual selection and refining techniques for better results.
Avoiding Overediting and Loss of Quality
Excessive editing can lead to a loss of image quality. Make sure to preserve the integrity of the original image while editing.
Best Practices for Background Removal
To become proficient in background removal, follow these best practices:
Save a Copy of the Original Image
Always create a backup of the original image before making any edits to avoid irreversible changes.
Experiment with Different Apps and Techniques
Explore various apps and techniques to find the ones that suit your editing style and achieve the best results.
Practice and Patience
As with any skill, practice is key to becoming proficient. Be patient with yourself and keep experimenting to improve.
Conclusion
Removing the background from pictures on your iPhone opens up a world of creative possibilities. Whether it’s for professional projects or social media fun, the ability to edit images seamlessly is a valuable skill. With the built-in editing tools and third-party apps available, anyone can master background removal and elevate their photo editing game.
FAQs
Background removal may take some practice, but with the right tools and techniques, beginners can achieve impressive results.
Each app has its strengths. Background Eraser, Remove.bg, and Superimpose are among the top choices based on user reviews.
Yes, removing backgrounds from complex images is possible with advanced tools and precise manual editing.
When done correctly, background removal should not significantly impact the image’s quality.
Yes, some apps offer free versions with basic features for background removal.


